Introduction
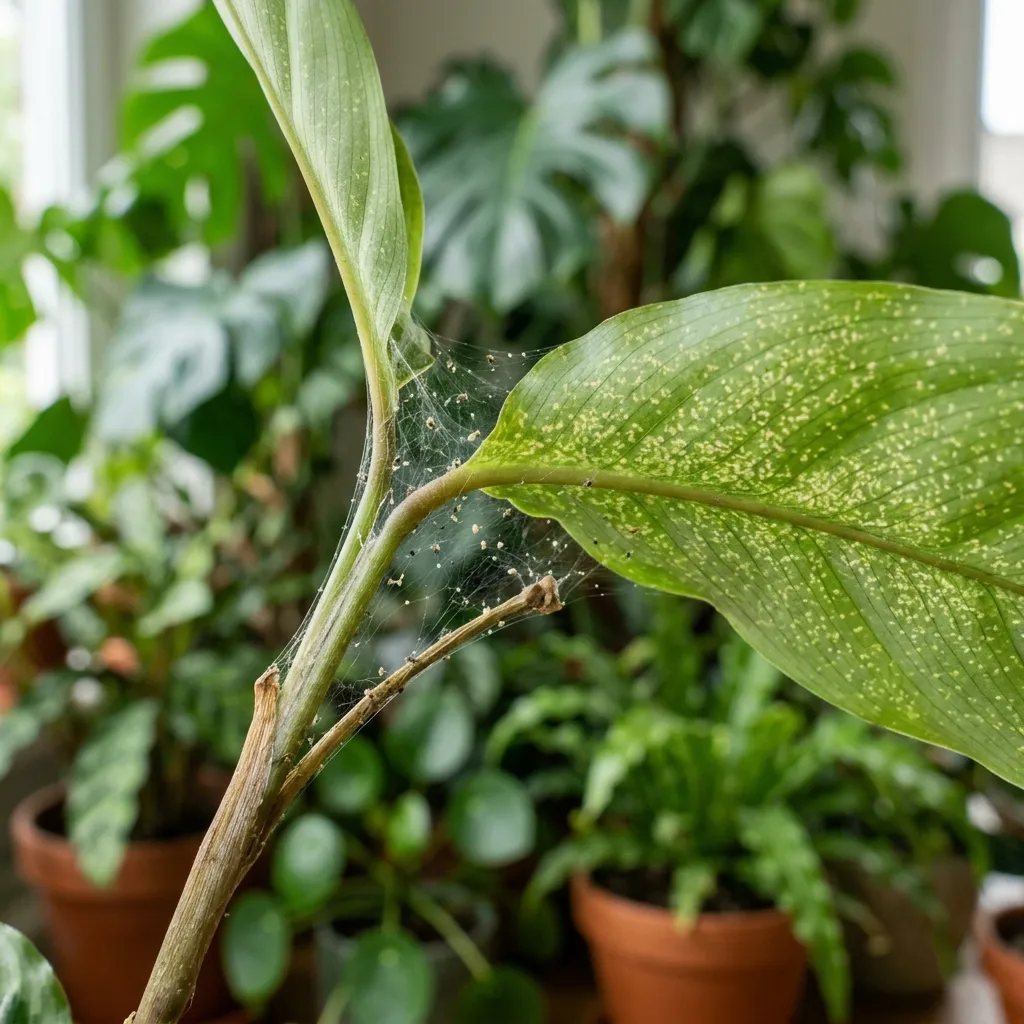
Spider mites are the ninjas of the houseplant pest world. They’re so small you can barely see them, they work silently on the undersides of leaves where you never look, and by the time most people notice them, the infestation is already well-established. I learned this the hard way when I discovered an entire colony had set up shop on my beloved Calathea — a plant I looked at every single day without noticing anything wrong until delicate webs started appearing between the leaves.
What makes spider mites particularly frustrating is that they thrive in the exact conditions many of our homes provide: warm, dry air. If you run your heat in winter or live in an arid climate, you’re essentially rolling out a red carpet for them. But here’s the good news — spider mites are absolutely beatable, and with the right approach, you can eliminate them and prevent them from coming back.
In this guide, I’ll walk you through exactly how to identify spider mites, the step-by-step treatment protocol I use, and — most importantly — how to create an environment that makes your plants hostile territory for these microscopic pests. For a broader overview of common houseplant pests, check out my complete indoor plant pest guide.
How to Identify Spider Mites
Spider mites are sneaky, and catching them early makes treatment dramatically easier. Here’s what to look for:
Visual Signs on Leaves
- Stippling: Tiny yellow or white dots on the upper surface of leaves. Each dot is where a mite has punctured a cell and sucked out the contents. Early stippling is easy to mistake for dust.
- Yellowing or bronzing: As feeding intensifies, stippling merges into larger patches of yellowing or a bronze, washed-out appearance.
- Fine webbing: This is the signature sign. Spider mites spin delicate, silky webs — much finer than a regular spider’s web — between leaves, along stems, and across leaf surfaces. By the time you see webbing, the population is significant.
- Leaf curling and drop: Heavily infested leaves may curl, dry out, and fall off.
If you’re noticing unexplained yellowing on your plants, spider mites should be one of the first things you check for. I’ve written about other causes of yellow leaves on houseplants too — it’s worth ruling out watering issues and nutrient deficiencies.
The Paper Test
Here’s the simplest way to confirm spider mites: hold a piece of white paper under a suspect leaf and gently tap or shake the leaf. If tiny dots fall onto the paper and start slowly moving, you have spider mites. They look like walking periods — barely visible to the naked eye.
Which Plants Are Most Vulnerable?
Spider mites aren’t picky, but some plants seem to attract them more than others:
- High risk: Calathea, Alocasia, English Ivy, Palms, Hibiscus, Roses
- Moderate risk: Fiddle Leaf Figs, Rubber Plants, Schefflera
- Lower risk: Snake Plants, ZZ Plants, Pothos (though no plant is truly immune)
In my experience, thin-leaved tropical plants that prefer humidity are the most vulnerable because they’re often kept in conditions drier than they’d like — which is exactly what spider mites love.
Understanding the Spider Mite Lifecycle
Knowing how spider mites reproduce helps you understand why treatment requires persistence.
| Stage | Duration | Details |
|---|---|---|
| Egg | 3-5 days | Tiny, round, translucent eggs laid on leaf undersides |
| Larva | 2-3 days | Six-legged (adults have eight), begins feeding immediately |
| Nymph (2 stages) | 3-5 days total | Grows and molts, continues feeding |
| Adult | 2-4 weeks lifespan | Females lay up to 20 eggs per day |
Here’s the alarming math: a single female can produce hundreds of eggs in her lifetime, and the entire lifecycle from egg to reproducing adult takes as little as one to two weeks in warm conditions. This is why small populations explode seemingly overnight, and why you need to treat repeatedly to catch newly hatching generations.
Step-by-Step Spider Mite Treatment
Here’s the exact protocol I follow every time I discover spider mites. It’s methodical, but it works.
Step 1: Isolate the Plant Immediately
The moment you confirm spider mites, move the infested plant away from all other plants. Spider mites spread through direct contact between plants and can even travel on air currents. Put the plant in a separate room if possible.
Before moving it, carefully inspect neighboring plants — the infestation may have already spread. Check leaf undersides with a magnifying glass or the paper test described above.
Step 2: Shower Blast
Take the plant to a sink, bathtub, or shower and give it a thorough rinse with room-temperature water. Focus on the undersides of every leaf — this is where mites feed and lay eggs. Use moderate water pressure; you want to physically dislodge mites without damaging the foliage.
This single step can remove a significant percentage of the population. It won’t eliminate them (eggs cling tightly to leaf surfaces), but it reduces their numbers dramatically and gives your treatment products less work to do.
While you’re at it, this is a great time to think about making regular leaf cleaning part of your routine — it’s one of the best preventive measures against spider mites.
Step 3: Apply Neem Oil
Neem oil is my first-line treatment for spider mites. It works through multiple mechanisms: it suffocates mites on contact, disrupts their ability to feed and reproduce, and leaves a residual coating that deters new mites.
How to apply neem oil:
- Mix cold-pressed neem oil according to package directions (typically 1-2 tablespoons per quart of water with a few drops of dish soap as an emulsifier).
- Pour the mixture into a spray bottle.
- Spray every surface of the plant — tops and bottoms of leaves, stems, petioles, everywhere. Mites hiding in crevices will survive if you miss spots.
- Apply in the evening or on overcast days. Neem oil + direct sunlight can burn leaves.
- Repeat every 5-7 days for at least 3-4 applications.
The 5-7 day interval is critical because it aligns with the egg hatching cycle. Your first application kills active mites, but eggs are resistant. By treating again before the next generation reaches reproductive maturity, you break the cycle.
Step 4: Insecticidal Soap (Alternate Treatment)
If neem oil isn’t available or you want to alternate treatments (which I recommend to prevent resistance), insecticidal soap is highly effective. It works by dissolving the mites’ protective outer coating, causing them to dehydrate.
Application is the same as neem oil: thorough coverage of all plant surfaces, repeated every 5-7 days. You can alternate between neem oil and insecticidal soap on successive treatments for maximum effectiveness.
Step 5: Increase Humidity
Spider mites despise humidity. Dry air (below 40% relative humidity) is their ideal breeding ground, while humidity above 60% significantly slows their reproduction.
After treating the plant:
- Run a humidifier near the affected plant
- Group plants together (once non-infested plants are confirmed clear)
- Consider a pebble tray beneath the plant
For a deeper dive into humidity options, check out do houseplants need humidity and my best humidifiers for indoor plants guide.
🌿 Get the LEVOIT Humidifier — Spider Mites Hate Humidity Above 60%Step 6: Monitor for Weeks
Here’s where most people fail — they treat once or twice, see improvement, and stop. Spider mites are notorious for bouncing back from incomplete treatment because a few surviving eggs can restart the entire infestation.
Continue monitoring for at least 4 weeks after the last sign of activity. Check leaf undersides weekly with the paper test. If you see any mites, restart the treatment cycle.
Treatment Protocol Summary
| Day | Action |
|---|---|
| Day 1 | Isolate plant, shower blast, first neem oil application |
| Day 5-7 | Second treatment (insecticidal soap) |
| Day 10-14 | Third treatment (neem oil) |
| Day 15-21 | Fourth treatment (insecticidal soap) — if still seeing activity |
| Day 21-60 | Weekly monitoring, paper test checks |
For Severe Infestations
If webbing is extensive and the plant is losing leaves rapidly, you’re dealing with a major population. In severe cases, consider these additional measures:
Predatory Mites
Yes, you can fight mites with mites. Predatory mites (such as Phytoseiulus persimilis or Neoseiulus californicus) are natural enemies of spider mites and can be purchased online. They actively hunt and consume spider mites and their eggs, then die off when the food source is gone.
Predatory mites work best in warm, humid conditions and are a genuinely effective biological control — especially if you’re dealing with a recurring problem or have a large collection.
Rubbing Alcohol Spot Treatment
For heavily infested areas, you can dab rubbing alcohol (70% isopropyl) directly onto clusters of mites with a cotton swab. This kills them on contact. It’s not practical for whole-plant treatment, but it’s useful for targeting visible concentrations.
When to Consider Discarding the Plant
I hate saying this, but sometimes a plant is too far gone. If more than 70-80% of the foliage is damaged, the plant is severely weakened, and it’s near other high-value plants you want to protect, it may be more practical to discard the infested plant rather than risk spreading mites to your entire collection.
I’ve had to make this call once — with a badly infested English Ivy that was next to my prized Monstera. It wasn’t an easy decision, but it was the right one.
Prevention: Making Your Home Hostile to Spider Mites
Prevention is always easier than treatment. Here’s how to create conditions that spider mites hate:
Maintain Humidity Above 50%
This is the single most impactful preventive measure. Spider mites reproduce explosively in dry air and sluggishly in humid conditions. If you can keep your plant area above 50-60% relative humidity, you’ve eliminated their biggest advantage.
A good hygrometer (most humidifiers include one) helps you monitor levels. In my experience, winter months with central heating are the danger zone — humidity can drop below 30% without you realizing it.
🪴 Get the XLUX Moisture Meter — Monitor Soil Conditions That Attract PestsClean Leaves Regularly
Dusty leaves are an invitation for spider mites. Wiping leaves with a damp cloth every few weeks removes dust, debris, and any mites trying to establish a foothold. I make this part of my regular plant maintenance routine — usually when I’m watering.
Inspect New Plants
Every new plant that enters your home should be quarantined and inspected before joining your collection. Check leaf undersides carefully, do the paper test, and keep the new plant isolated for at least two weeks. This applies to plants from nurseries, big box stores, and even gifts from friends.
Improve Air Circulation
Stagnant air creates pockets of warm, dry microclimate that mites love. A gentle fan or improved ventilation helps create conditions less favorable to mites while also benefiting your plants’ overall health. Read more about how to improve air circulation for indoor plants.
Regular Inspections
Make it a habit to flip leaves over and check the undersides every time you water. It takes seconds per plant and catches infestations when they’re still tiny and easy to treat. I found my most recent spider mite problem on a single leaf — treated it immediately, and it never spread.
Spider Mites vs. Other Common Pests
Not sure if you’re dealing with spider mites or something else? Here’s a quick comparison:
| Pest | Size | Key Identifier | Location |
|---|---|---|---|
| Spider mites | Tiny (barely visible) | Fine webbing, stippled leaves | Leaf undersides |
| Fungus gnats | Small (visible flies) | Flying insects near soil | Soil surface |
| Mealybugs | Small (visible) | White, cottony clusters | Leaf joints, stems |
| Aphids | Small (visible) | Clusters of soft-bodied insects | New growth, stem tips |
| Thrips | Tiny | Silvery streaks on leaves | Leaf surfaces |
If you’re dealing with those tiny flying insects hovering around your soil instead, that’s a different problem entirely — check out how to get rid of fungus gnats.
FAQs
Q: What do spider mites look like on houseplants? A: Spider mites are incredibly tiny — about the size of a period at the end of a sentence. They appear as small dots (usually red, brown, or yellowish-green) on the undersides of leaves. The most noticeable sign is the fine, silky webbing they produce between leaves and along stems. Stippled or speckled yellowing on leaves is another telltale indicator.
Q: Can spider mites spread to other houseplants? A: Yes, spider mites spread easily between plants. They can crawl from plant to plant when leaves touch, travel on air currents, or hitch a ride on your hands and clothing. This is why isolating an infested plant immediately is the most critical first step in treatment.
Q: Does neem oil kill spider mites? A: Yes, neem oil is effective against spider mites. It works by suffocating them and disrupting their reproductive cycle. However, neem oil needs direct contact with the mites to work, so thorough application to all leaf surfaces — especially the undersides — is essential. Multiple applications spaced 5-7 days apart are usually necessary.
Q: Why do I keep getting spider mites on my houseplants? A: Spider mites thrive in hot, dry conditions. If your home has low humidity (below 40%), you’re creating an ideal environment for them. Overheated rooms, proximity to heating vents, and dusty leaves also attract spider mites. Increasing humidity and regularly cleaning your plant leaves are the best preventive measures.
Q: How long does it take to get rid of spider mites? A: Expect the treatment process to take 2-4 weeks minimum. Spider mite eggs can take 3-5 days to hatch, and you need to treat through at least two full reproductive cycles to eliminate eggs that survive initial treatments. Continue monitoring for at least a month after the last sign of activity.
Q: Are spider mites harmful to humans or pets? A: No, spider mites are not harmful to humans or pets. They feed exclusively on plant cells and cannot bite or infest people or animals. However, some treatment products like neem oil or insecticidal soap should be used according to label directions and kept away from curious pets during application.
Happy growing! 🌿