Introduction
I still remember the first time I propagated a Monstera. I’d been staring at my overgrown Monstera deliciosa for weeks, watching it send aerial roots in every direction and wondering if I could actually turn one plant into two. I finally worked up the courage to make the cut — and honestly, my hands were shaking a little. Fast forward six weeks, and I was holding a rooted cutting with a brand-new leaf unfurling. That moment was genuinely thrilling.
Propagating Monstera is one of the most rewarding things you can do as a plant parent. Whether you want to fill your home with more of that gorgeous tropical foliage, share a cutting with a friend, or just manage a plant that’s outgrown its space, learning how to propagate Monstera deliciosa is a skill you’ll use again and again.
In this guide, I’ll walk you through every step of the process — from identifying the right node to choosing between water and soil propagation, plus the timeline you can realistically expect and the mistakes I’ve learned to avoid the hard way.
Understanding Monstera Nodes (The Most Important Part)
Before you pick up your shears, you need to understand one thing: nodes are everything. Without a node, your Monstera cutting will never root. Period.
A node is the slightly thickened, knobby section of stem where leaves, aerial roots, and new growth emerge. Here’s how to spot one:
- Look for the bumps: Nodes appear as raised rings or bumps on the stem, usually brownish or slightly darker than the surrounding stem.
- Check where leaves attach: Every leaf connects to the stem at a node. Follow the leaf’s petiole (the long stalk) back to where it meets the main stem — that’s your node.
- Aerial roots are a giveaway: Those brown, stringy roots growing out into the air? They emerge directly from nodes. If you see aerial roots, you’ve found a node.
The smooth sections of stem between nodes are called internodes. A cutting that’s just internode and leaf — no node — will sit in water looking pretty but will never develop roots. I’ve seen people keep nodeless cuttings alive for months, mistaking survival for growth. Don’t make that mistake.
What You’ll Need
Gather your supplies before you start. Having everything ready makes the process smoother and reduces the time your cutting is exposed to air.
- Sharp, clean shears or a knife: Dull cuts crush the stem and invite infection. I use sterilized pruning shears.
- Rubbing alcohol or hydrogen peroxide: For sterilizing your cutting tool.
- A glass jar or propagation vessel: If water propagating. Clear glass lets you monitor root growth.
- Well-draining potting mix: If soil propagating. A chunky aroid mix works best.
- A small pot with drainage: For soil propagation or for potting up after water propagation.
- Optional: rooting hormone: Can speed things up slightly, but Monsteras root reliably without it.
How to Take a Monstera Cutting: Step by Step
Step 1: Choose Your Cutting Location
Look for a section of stem with at least one node (ideally two) and one to two healthy leaves. Cuttings with an existing aerial root have a head start — that aerial root will adapt to absorb water and nutrients.
I recommend taking your cutting from a section where the plant looks leggy or overgrown. This way, you’re shaping the mother plant while creating a new one. If your Monstera has been growing tall and sparse, check out why your Monstera might not be splitting — it could be a light issue.
Step 2: Make the Cut
Cut about 1-2 inches below the node you want to include. Use a single, clean cut — don’t saw back and forth. The cleaner the cut, the lower the risk of rot.
If you’re taking a mid-stem cutting (not from the top of the plant), you’ll also need to cut above the node that remains on the mother plant. The mother plant will eventually push out new growth from that node.
Step 3: Let the Cut Callous (Optional but Helpful)
Set your cutting on a clean paper towel for 30-60 minutes to let the cut end dry slightly. This thin callous can help prevent rot, especially if you’re propagating in soil. For water propagation, this step is less critical, but I still do it out of habit.
Step 4: Remove Lower Leaves
If your cutting has a leaf emerging from the lowest node, remove it. You want that node submerged in water (or buried in soil) without a leaf attached, since submerged leaves will rot and foul the water.
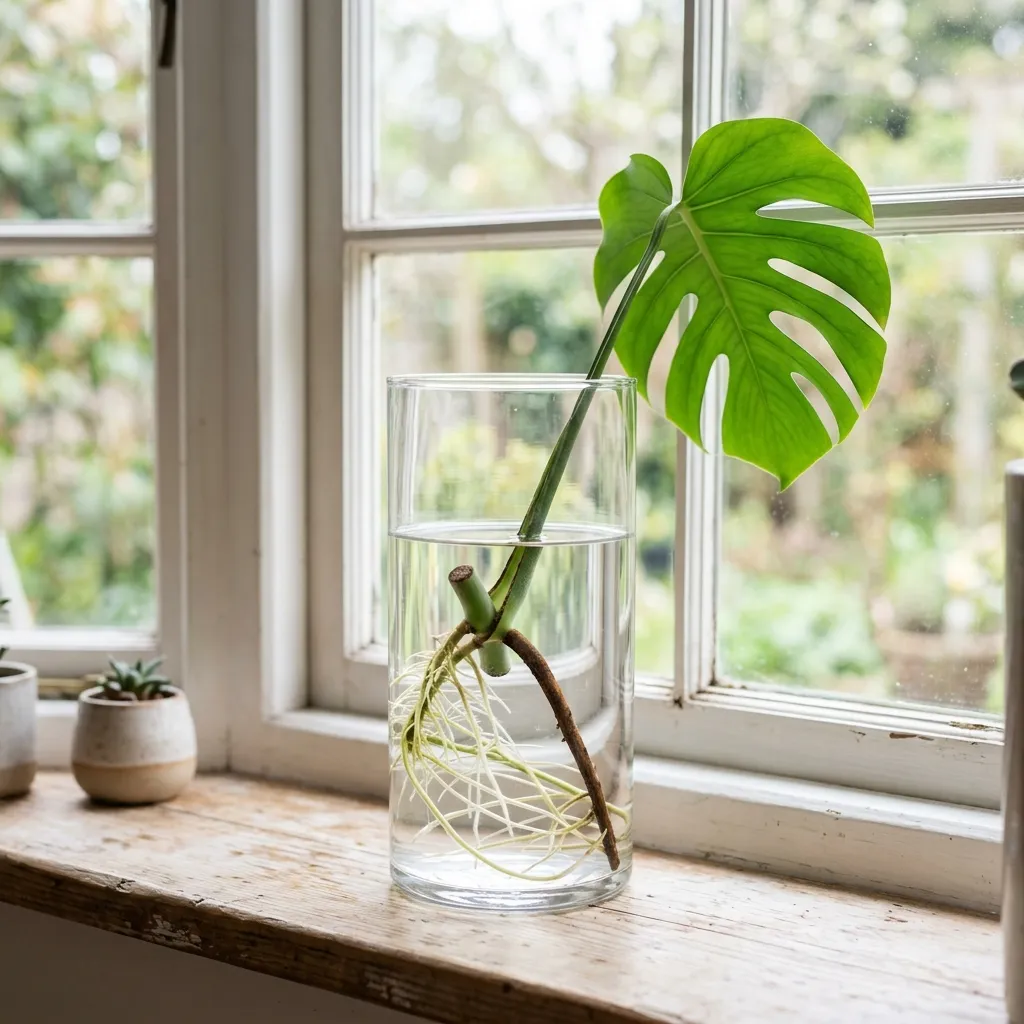
Water Propagation: The Visual Method
Water propagation is my go-to recommendation for beginners because you can see exactly what’s happening. There’s no guessing about whether roots are forming — you just look.
How to Do It
- Fill a clean glass jar with room-temperature water. Filtered or dechlorinated water is ideal, but I’ve had great results with regular tap water that’s sat out overnight.
- Place your cutting so the node is submerged but the leaves stay above water.
- Position in bright, indirect light. Avoid direct sun — it heats the water and promotes algae.
- Change the water every 3-5 days. Fresh water provides oxygen and prevents bacterial buildup. This is the single most important maintenance step.
What to Expect (Timeline)
| Timeframe | What You’ll See |
|---|---|
| Week 1-2 | Small white bumps (root initials) appear at the node |
| Week 2-3 | Tiny white roots begin to extend |
| Week 3-4 | Roots reach 1-2 inches long |
| Week 4-6 | Root system is 2-3 inches with secondary branching |
| Week 6-8 | Ready to pot up — roots are robust enough to support the plant in soil |
When I propagated my first Monstera, I checked the jar obsessively — like, multiple times a day. Watching those first white nubs appear at the node was genuinely exciting. By week three, I had actual roots, and by week five, the cutting was ready for soil.
Soil Propagation: The Low-Maintenance Method
Soil propagation skips the transition step entirely. Your cutting develops roots directly in its final growing medium, which means no transplant shock later. The tradeoff is that you can’t see the roots developing, so you need to rely on other signs of progress.
How to Do It
- Prepare a small pot with well-draining soil. A mix of potting soil, perlite, and orchid bark works beautifully. Check out my guide on the best soil mix for indoor plants for the exact ratios I use.
- Moisten the soil so it’s damp but not sopping wet.
- Bury the node 1-2 inches deep. If your cutting has an aerial root, bury that too.
- Optionally, dip the cut end in rooting hormone before planting.
- Keep the soil consistently moist (not wet) for the first 4-6 weeks. This is critical — the cutting has no roots yet and can’t pull water from dry soil.
- Place in bright, indirect light and consider covering loosely with a clear plastic bag to maintain humidity.
How Do You Know It’s Working?
After about 4-6 weeks, give the cutting a very gentle tug. If you feel resistance, roots have formed. New leaf growth is the definitive confirmation that your cutting has rooted successfully.
🌱 Get FoxFarm Ocean Forest Soil — Rich, Well-Draining Mix Ideal for MonsteraWater vs. Soil Propagation: Which Should You Choose?
| Factor | Water Propagation | Soil Propagation |
|---|---|---|
| Visibility | ✅ Can see roots forming | ❌ Roots hidden in soil |
| Beginner-friendly | ✅ Very forgiving | ⚠️ Requires moisture management |
| Speed to first roots | ✅ Slightly faster | ⚠️ Similar, but harder to confirm |
| Transplant shock | ❌ Must transition to soil later | ✅ No transition needed |
| Long-term root quality | ⚠️ Water roots need to adapt to soil | ✅ Soil-adapted roots from day one |
| Maintenance | 🔄 Water changes every 3-5 days | 💧 Keep soil moist, not wet |
In my experience, water propagation has a slightly higher success rate for beginners simply because you can catch problems early. If the stem starts turning brown or mushy, you’ll see it immediately. With soil propagation, rot can happen underground where you won’t notice until it’s too late.
That said, if you’re propagating multiple cuttings and don’t want to deal with water changes, soil propagation is perfectly reliable.
When and How to Pot Up Water-Propagated Cuttings
This is where a lot of people stumble. You’ve grown beautiful roots in water — now what?
When to Pot Up
Wait until the roots are 2-3 inches long with some secondary branching. Roots that are too short won’t anchor the cutting, and roots that are too long become brittle and prone to breaking during planting. The sweet spot is usually around 4-6 weeks.
How to Transition
- Choose a pot that’s appropriate for the cutting’s size — usually a 4-6 inch pot. If you’re not sure, my guide on how to choose pot size will help.
- Use a well-draining aroid mix. Pre-moisten it before planting.
- Plant at the same depth the node was submerged in water.
- Water thoroughly after planting and keep the soil consistently moist (not soggy) for the first 2-3 weeks. This helps water roots transition to functioning in soil.
- Gradually reduce watering frequency after the first few weeks, shifting to a normal Monstera watering schedule.
For a detailed walkthrough of the repotting process, check out how to repot houseplants — the same principles apply.
Common Monstera Propagation Mistakes
I’ve made most of these mistakes myself, so consider this a list of hard-won lessons.
1. Cutting Without a Node
I covered this above, but it bears repeating: no node, no roots. Double-check before you cut.
2. Not Changing the Water
Stagnant water breeds bacteria. If the water turns cloudy or smells funky, your cutting is at risk. Every 3-5 days — set a reminder on your phone if you need to.
3. Too Much Direct Sunlight
Direct sun heats the water, promotes algae, and can scorch the leaf. Bright indirect light is what you want — the kind of light where you’d comfortably read a book without squinting.
4. Keeping Too Many Leaves
A cutting with four leaves and no roots is trying to support a lot of foliage with no water uptake system. One or two leaves is ideal. If leaves start yellowing, the cutting may be telling you it can’t support them all.
5. Potting Up Too Early
I know it’s tempting to get your cutting into soil the moment you see roots. But tiny, fragile roots are easily damaged during planting. Wait for 2-3 inches of root length with branching.
6. Forgetting About the Mother Plant
After taking a cutting, the mother plant will look a bit sad with a bare stem. Don’t worry — it will push new growth from the node just below where you cut. Give it good light and its regular care. If you need a refresher, check out the full Monstera care guide.
Propagating Other Houseplants
Once you’ve successfully propagated a Monstera, you’ll probably want to try other plants. The process for propagating Pothos is similar and arguably even easier — check out how to propagate Pothos for a side-by-side comparison. Pothos is actually how I first got into propagation before working up to Monstera.
Pro Tips for Faster Rooting
- Warmth helps: Roots develop faster in warm conditions (70-80°F). If your home is cool, consider placing the cutting on top of a refrigerator or near (not on) a heat source.
- Aerial roots are your friends: Cuttings with existing aerial roots root significantly faster. That aerial root will transition into a functional water-absorbing root.
- Keep it humid: If soil propagating, a loose plastic bag over the cutting creates a mini greenhouse effect that encourages root development.
- Don’t fertilize yet: Wait until the cutting is established in soil and pushing new growth before introducing any fertilizer.
FAQs
Q: How long does it take for Monstera cuttings to root? A: Monstera cuttings typically develop visible roots in 2-4 weeks, with strong enough roots to pot up in 4-6 weeks. Water propagation tends to show roots slightly faster since you can watch progress daily.
Q: Can you propagate Monstera without a node? A: No. A node is absolutely required for successful Monstera propagation. A leaf without a node may survive in water for weeks or even months, but it will never develop roots or new growth. Always make sure your cutting includes at least one node.
Q: Is it better to propagate Monstera in water or soil? A: Both methods work well. Water propagation lets you monitor root development and has a slightly higher success rate for beginners. Soil propagation skips the transplant shock step but requires more careful moisture management. Choose whichever method you feel more comfortable with.
Q: What time of year is best to propagate Monstera? A: Spring and early summer are ideal because the plant is in its active growing season. Propagation during fall and winter is possible but will take significantly longer, and success rates tend to be lower.
Q: Why is my Monstera cutting turning yellow in water? A: Yellowing usually means the water isn’t being changed frequently enough, the cutting is getting too much direct sunlight, or the stem is rotting. Change the water every 3-5 days, keep the cutting in bright indirect light, and trim any mushy or brown parts of the stem immediately.
Q: How many nodes should a Monstera cutting have? A: One node is the minimum, but cuttings with 2-3 nodes and 1-2 leaves tend to root faster and establish more quickly. Avoid taking cuttings with more than 3-4 leaves, as the cutting may struggle to support all that foliage without roots.
Happy propagating! 🌿